Crafts and Home Decor With Leaves
Every year many people are faced with the never ending piles of leaves that are left behind by the trees on the property. There are many natural comfort options and thermal uses for the garden that leaves are great for. But what about other more creative options…
Aside from the almost unlimited children’s crafts that can be done with leaves, there are a lot of really great decor elements that can be creature using leaves as well.
At this time of year the garden leave situation may seem never ending and very irritating. Why not try and make it fun by using some of those leaves to create some easy and great decor elements for your home.

Leaf bowel and platters – I have seen this done in may different ways. For this project you will need some craft glue, a sponge brush, plastic wrap and plate or a balloon.
The craft glue will need to be watered down a bit so you may want to use a disposable plastic bowel to make the mixture. Depending on what you want to use the leave creations for you can choose to use a plate with plastic wrap, or a balloon that you will need to pop at then end.
Let’s look at them one at a time…
A great application for the leaf bowls like the one above, is to use it as a great centre piece on a table or coffee table.
For this you will need to blow up a balloon to your desired size, you will also need a cylinder type shape jar or holder to place the balloon in so you can glue the leafs to the top rounded area of the balloon and leave it to dry without you having to hold it the whole time… the point is to make this fun and easy not a time consuming project that has you carriying around a balloon for a few hours.
The step by step process:
- You will need a balloon, a cylinder shaped item that can be used as a holder, some craft glue and a sponge brush. You will need a mixing bowl for the glue. And of course a collection of leafs you have gathered that are perfect for the project .
- Blow the balloon up to your preferred size. You will be using the round part of the balloon for the bowl. Tie the balloon off when you are ready. Place the balloon in your holder, round part facing up.
- Mix your craft glue in your mixing bowel with some water. You don’t want to water the glue down completely, you just want to thin it out a bit so it’s easier to apply to the leafs.
- Next is the fun and somewhat messy part, so make sure you are using a surface you don’t mind getting some glue on, or have your table top covered.
- One by one you will glue the leaves to the balloon creating the shape and layerd look you want. Be generous with the glue cover, you want to make sure the entire surface of the leafs is covered with the glue, it will help limit the cracking once it dries.
- Make sure you layer them on, don’t just do one thin layer of leaves, your bowls will then be very fragile and may not last very long. A few lays is best, it will also add some dynamic to the design and shape.
- Once you have a size and shape you are happy with, leave it to dry completely. A few hours at least
- Once the glue is completely dry you ban then poke a while in the balloon close to when you ties the balloon off… thieves is important, you don’t want to balloon to burst and possible break the leaf bowel. By putting a whole close to wear you tied the balloon off, the air will leak slowly. As the air leaks out gently pull the leaf bowl off of the balloon until it is completely free and all that remains is you wonderful fall creation.
Leafs plates or platters – these are great for layering under a dinner plate at your table, or platters for displays in the centre of the table. The process for creating your plates are almost exactly the same except you will need to change a few things up…
- Use a plate that represents the size you want your leaf plate to be and cover it with plastic wrap.
- Create your glue mixture just as you would for the bowls
- Make sure your surface is covered incase of mess
- Start to glue down the leafs to the plastic on the plate to create the desired look, for a great effect have some of the leafs hang off of the plate so that if you are using it under your dishes for your place settings you will have a great visual effect of the leafs sticking out form under the plates.
- Once you are happy with the look, let the glue dry and set, give it at least a few hours
- Once the glue is dry, flip the plates, undo the plastic wrap and slowly start to peel it away from your leaf plate.

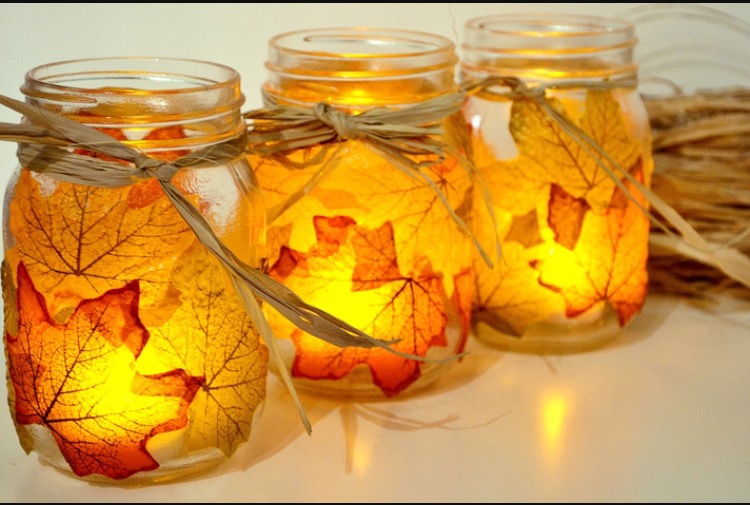
Mason jars are increasing in popularity in home decor. String lights are also increasing in popularity. So why not create a project that can incorporate both elements.
The mason jars are super cute and have endless possibilities, but you can really use any glass jars, cups, holders, whatever you want to use for this project.
Step by step:
- choose the glass jar you want to use for your project, make sure you have a sponge brush and some craft glue. You will also want a mixing bowl for the glue. And of course the leafs you have collected for the project. The string lights are optional, but look great if you decide to use them
- This project is a bit different from the others as you are not removing the leafs form the surface, you want them to stay on.
- Make sure you apply glue to both sides of the leafs before you apply them to the jars, also keep in mind how much you layer them, the thinker the layers the less light will shine through. You can manipulate the layers to help create some dimension in the jars so it has some light and dark areas for effect.
- Let the leafs dry completely before handling them so that your design doesnt move around.
- If your using string lights, once the jars are dry you can put your lights in and off you go
- The example above uses some straw string for little ties at the top, you can do the same or you can also use a ribbon if you would like. This is your decor element, do what ever will look best in your space
These jars are great in kitchens, dining room table set ups. Little accents on your mantel or even in a powder room to add some fall flare for company when they visit.
Just have fun with it

This is a fun piece for a porch or patio. For this you will need something for the top to hang the leafs off of, string or thin rope. Leafs that you chose for the project. And some pine cones to give it some weight at the bottom. Depending on haw you would like to attach the leafs to the string you may want to consider some hot glue as it may be easier then trying to tie around the leaf steams.
Step by step:
- Start with choosing your location. This will help you decide how long you want the stings to be.
- If you are using hot glue for attaching the leafs you can pre cut all the string to the length you want them to be.
- If you are someone who wants everything to look just right, you can lay out the string and lay out the leafs on them so you can see how they will look before you glue things down. Once your happy you can start to apply the glue to the leafs. Great thing with the hot glue, it sets quickly so you won’t have to wait long for the drying process to start putting things together.
- Once you have all your strings set you can attach the pine cone to the ends
- Now it’s time to add them to the base you chose to hangs them from. I’m a big fan of natural wood look, so I would choose some silver birch branches or some other kind of branch and tie them off to make an X for my leaf stands to hang from.
- Strand by strand tie them onto your branch pieces until you have them all set up.
- Apply your hanging rope to the centre of the wood, and hand it up in your approved spot on your porch. You can also use this indoors if you like as well over a mantel or table top.
Getting creative and having fun with DIY projects is some of the best parts of the fall and holiday seasons. Imbrace your inner creative side and let the creative juices flow. All the ideas I shared with you today are great starting points. You can change things up and add elements that suit you and your home.
Sometimes when the season starts to change it all becomes stress when you start thinking about all the hosting you may have to do, and the possible expenses that go with it. Taking some time for creative projects can really be relaxing, it can take your mind off some things, and it can offer some you time you may really need. Another great bonus to crafting at home is the cost is very limited. Most if not all the materials you would need for these projects can be found in nature or at the dollar store.
If you decide to try any of these projects leave a msg below, and if you can, add a pic or two, I woukd love to see some of your creations…
6 thoughts on “Crafts and Home Decor With Leaves”
I love the look of the mason jars with leaves and lights. I am definitely making these for fall!
Fall really is my favourite time of year. Not only for the fashion. But the fall decor elements are so cozy and warm as well. I made these this year for my mantel… Looked great! Let me know how your experience was when you make them 🙂
its a little late this year for the leave project. Currently way to much now out, but I will keep this in mind for next year 🙂
yes way to much snow out where I am too… When you make them please send pics…
I’m always looking for some projects to do with the kids, they would love playing in the yard and picking leaves for some of these projects. I will say, the mason jars are my favorite, I live how versatile they are.
I have some great strung lits that would be perfect to put inside them in my mantel. I’ll have to stop by and leave a picture once I make them.
Great post, thanks k’s for putting this together.
Family craft time is amazing… I made the leaf platters for under my plates for my thanksgiving dinner. Was such a cool effect got lots of compliments on it. And the best part was really fun to put together. Please send me pics when you make your mason jars, would love to see them